Sunday, September 23, 2012

A Hint Of Color

Black and white photographs are always so pretty, very classic and simple.  That is also how I feel about graphite and charcoal drawings.  I have been looking at lots of examples of wedding pictures lately and there are always a few black and white photographs.  I have been seeing more and more black and white photographs with the bride and groom in color, just the brides flowers in color, her heels in color and so on.  I wanted to try that with my charcoal drawings.
Instead of only drawing a pumpkin, I tried drawing corn stalks behind the pumpkins to add a little something different:


Added just enough color with my pastels.

My messy work area:

Here's the finished piece with a mat and in a frame.  I chose a burnt orange mat to highlight the orange in the pumpkins.  It was also a really nice Fall color.  I didn't want too bright of an orange because the charcoal makes the picture much darker than if I had used graphite.
 I really like how this piece came out!
This piece will be at the Mangiacotti Barn Sale that starts this Thursday.  Here are a few other pieces that I am dropping off to sell:

 I love these acorns!! They are so beautiful!

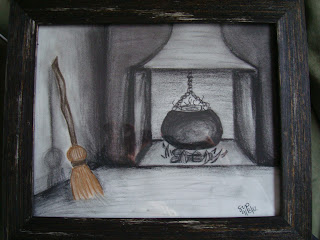
 I used just a hint of color in this spooky picture as well, the broom really pops with it!
 When I first started painting these sunflowers, they blended in too much with the color of the leaf so I had to go back and add some black because even the brown wasn't going to be dark enough of a contrast.  But a little black went a long way!


I didn't help set up and merchandise the Barn this time but I know my friends have been working extremely hard with the owner to get that Barn looking amazing!!
I am going to be helping out during the sale 2 days and am very pleased to be dropping some of my art off to sell! 
If anyone would like to stop by and check it out:
Thursday 9/27 and Friday 9/28 10am to 9pm & Saturday 9/29 and Sunday 9/30
117 Pleasant St. Attleboro, MA 02703 
I hope everyone is enjoying this beautiful weather as much as I am!!


Always,
      Savannah

Sunday, September 16, 2012

Something Borrowed, Something Blue, Something Handmade, Something New

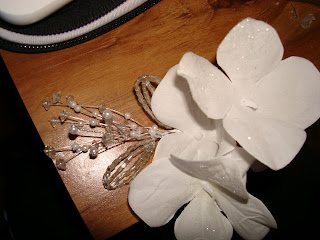
I've been thinking and looking at lots of different things for the wedding.  One thing in particular, what I'm going to do with and put in my hair.  I decided that I wanted to make my own hair piece.  I am having so much fun that I wanted to make lots of different ones and sell them on Etsy for other brides to buy.  During the commercials of the Patriots football game I got to work.  I lined up everything I had and went from there.

I set in the pieces before gluing them in.

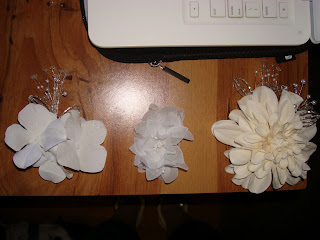
This one is by far my favorite!  I would be using it for myself if it matched my dress better.


The hydrangea flowers were so pretty in the big bunches but I'm not all too thrilled how they came out when I separated them.  I may add a few more.


These will be going up on Etsy in the next few days.

The little small flower in the center can be for a bride or for the flower girl.  I think I am going to make one of these for my flower girl to wear.  There will be many more of these and different styles coming up in the near future.  I may also experiment with some different colored flowers,  I'll have to see :)
Enjoy!
xoxo Savannah

Sunday, September 9, 2012

Paint Mixing Lesson

One of the important things I learned in class and through experience when mixing paint to create a color is to use one brush to mix with and another brush to paint with.  If you use the same brush to mix as you do to paint, some times you will get streaks of one of the hues on your painting that you do not want.  For instance, if you are mixing red and blue to get purple, the brush may look like it's only purple but you may get a red or a blue streak of paint that is underneath.

It's a little hard to tell but you can see lil streaks of blue in the purple paint.  In this particular painting I didn't want to see any streaks of a main hue, so I just had to keep repainting it.
For this blue canvas, I mixed blue and white and I purposely used the mixing brush to paint the canvas because I wanted to see the different streaks.  I figured if I used this as a sky in the background, it would look more realistic.

Here are two examples of mixing paint and seeing the different colors.  You need to make sure you mix them really well.  Like the orange below, I did not use the mixing brush to paint and some of the red streaked through, it wasn't mixed enough.
There are a few different ways you can mix paint.  You can mix on a pallet with a flat surface or a cupped pallet.  I personally prefer mixing with a cupped pallet because I think you don't waste as much paint and it will mix better.  Below is a picture of me using a waxed paper flat pallet.  My grandmother had some old pads with some of these and I wanted to try them out.

This is the cupped pallet I like to use.  There are 3 different kind of greens in this pallet, I wanted to paint with a grass green and my colors kept coming out evergreen.  I could not understand why.  Then I finally realized it was my blue hue!  I was using cobalt blue and that was giving me the evergreen color when I mixed it with yellow.  I needed to use cerulean blue.  Even though they are both blue, there is a difference.
For instance, this background behind the tree is cobalt blue mixed with white.  Mixing those 2 will give me a color a little closer to a periwinkle.  The canvas below is cerulean blue mixed with white.  Just by looking at the two you can tell there is a difference, even if it is slight, it's there.


Mixing paint I find to be an art all in itself.  It is an enjoyable part of painting.  When you are all done with a piece that has different tones, tints, shades and then you look at the main hues you mixed them with: red, yellow, blue and then added just white and black...it's amazing how many colors you made!
If you ever want to start painting.  I suggest you pick of the 3 hues I just mentioned and then black and white and experience the complete art of painting.  You can buy the colors individually ( brown, orange, purple, etc) but sometimes you won't be able to manipulate them the way you'd like.  Have fun with it!!

xoxo Savannah

Monday, September 3, 2012

Take Control of Your Plans

Each time school starts back up I am always shopping for a really good planner.  There is always so much going on once school starts, the holidays, different appointments, specific shopping lists, and this year wedding plans!  Finding the right planner is always so difficult!  I am never happy with the one I buy because the set up is never exactly the way I wanted it and the planners are always so boring!  When I was in high school, we used to cover our school planners and even our notebooks with picture collages, just to make them more interesting.
This year I am deciding to take control of it!  I am making my own planner that fits me and my needs.
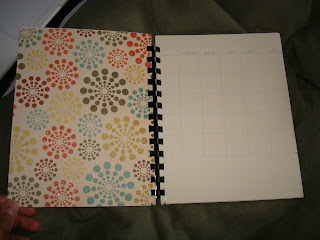
First, I found paper that was a little bit thicker than regular white printer paper and cut each page into the size I wanted.  I always end up keeping my planner in my pocketbook and the size is very important.  If I make it too small, I will feel that there is no room to write anything.  If I make it too big, it'll feel like I am carrying a big notebook with me wherever I go.  The next thing I did was organize how I would like the pages to be set up and start drawing the monthly calendar pages.  I enjoy making collages and to scrapbook.  I used some of my scrapbook pages and collaged some newspaper pieces together to make my planner more interesting to look at.
 The cover is not done, however I may leave it blank so I can doodle.

 I left room to draw something related to each month.  For September I drew a tree that I am going to paint.

 At the bottom of October I drew pumpkins (of course!)  I started to paint the stems and I think I am going to use color pencils for the rest.


This planner suits me, each month is written in a different color, there is room for me to sketch ideas, and I left blank pages in between some of the months.  I didn't leave blank pages between all of the months because I know I won't need that many, they are really for random to do lists.  Each month does have it's own note section just in case I have something specific.  The months closest to my wedding I left more blank pages because I'm assuming I am going to have more to do, more to write and more to plan when the time gets closer.  The blank pages are sometimes more useful then lined paper because I am a post-it note writer and this way I can stick the post-it any where on the page.  I also tend not to write on lines, I write upside down, in corners and around anything I need to.  Wherever I can fit it, I write it!

If you are able to take the time to make your own planner, I encourage it!  It is a lot of fun and you are able to make your planner for exactly what you need.

xoxo Savannah